You are a devoted Minecraft player who wants to create a personal shelter in the game? Have you ever wondered how to properly protect your territory and control access to the house? Welcome to our article dedicated to the creation of private in Minecraft. Here, we will talk in detail about how to properly fill your home to ensure the safety and control of access to your territory. Follow our instructions to successfully create and configure your private.

How to get a house with tools
The first step towards creating a private is the extraction of the necessary tool. A regular wooden ax or gold shovel will suit you. In the absence of a suitable tool, do not worry, you can get it through the console command:
- // Wand
After performing this command, you will have a tool for highlighting private points.
The choice of private points
Now that you have a tool, let’s choose a point for creating a private:
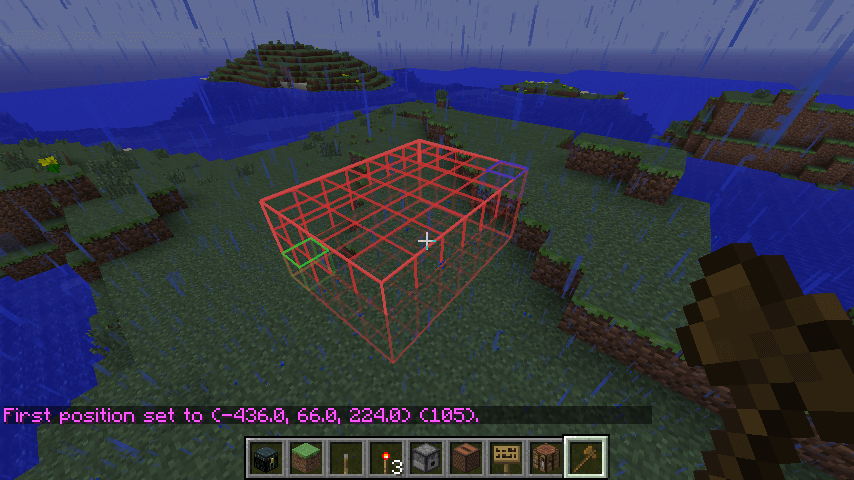
- With the left mouse button, highlight the first point on the house. After the correct allocation, a notification will appear in the chat that the first point is marked;
- With the right mouse button, highlight the second extreme point. There will be a notification confirming the mark of the second point.
Please note that the first and second points form a cube inside which your house will be fixed. Consider the scale of the future territory, especially if you plan to build underground premises or high buildings.
Code Recording
After the points are marked, we proceed to write a code for creating a private. Open the chat and enter the following command:
- /Rg Claim <The name of the region>
Click Enter, and your dedicated region will be filled up, and you will become an admin. Now only you, the admins of the server and those whom you add to the private will be able to interact with the elements inside it.
Remember, but better – write down the name of the region you have chosen. This name is useful to you when setting up flags or adding other players to Private.
Private house using console teams
This method is faster compared to the previous one, although it requires more code. Despite this, the algorithm remains the same. We just use commands instead of manual dot isolation:
- Go to the desired point, look at it, and enter the first command: // POS1;
- Click Enter, and the release of the first point is completed;
- Similarly, find the second point and use the command: // POS2;
- As a result, a cube is formed between the points with the protection area we need;
- Use the private installation command: /Rg Claim <The name of the region>. Now your house is dressed in defense, and you can control access to it;
Private shift (optional)
If you need to move private, use the command:
- // Shift <The name of the region> [U / D / N / S / W / E] <The number of blocks>. Where u, d, n, s, w, e indicate the direction (up, download, north, south, west, east).
In the case of an error in the amount of private, you can easily make adjustments:
- // Expand <Direction> <The number of blocks>
Reducing the region:
- // Contract <Direction> <The number of blocks>
Do not be afraid to experiment with the size of your private for perfect compliance with your needs. With these console commands, you easily and effectively protect your virtual house in Minecraft.
Add friends to private
Adding another player to your zone can improve your game experience and make it more pleasant. Imagine that you will explore and decorate your virtual house together or go to the adventure side by side. This is a great way to get closer to other people and create indelible memories.
If you want to share your private, use the following commands:
- /rg am <Player name>
This team will add a player with the selected name to the white list of private, which will allow him to interact with your house.
If you need to withdraw access, use the team:
- /rg rm <Player name>
This will remove the player with the chosen name from the white list of Private.
If you trust your friend’s full control over the private, you can make it the owner:
- /Rg AO <Player name>
Now your friend can manage a private just like you.
If it is necessary to change access rights, use the command:
- /rg ro <Player name>
This will take away from the player with the chosen name of the owner’s right, leaving him only basic rights in Private.
Conclusion
Now, following these steps, you have successfully filled up your house in Minecraft and even shared it with your friends. So why wait? Take the tools, mark the points, and feel free to start to fill your house in Minecraft! And do not forget that by adding friends to Private, you can get more to play the game and establish cooperation. So dare and take control of your world Minecraft today!


