Having made a card, you will not only get a practical navigation tool but also gain an additional level of personalization of your experience in Minecraft. By painting and marking the map, you can create a unique visual representation of your territories and attractions. So, let’s plunge into the game and discover the capabilities of cards in Minecraft.
How to make a simple card in Minecraft
- Collect the necessary materials. To create a simple card in Minecraft, you will need eight sheets of paper and one compass. Sheets of paper can be made by putting three stems of sugarcane in a horizontal row on a table. The compass can be made of four iron ingots and one red stone;
- Open the craft table. Having collected all the necessary materials, open the workbench, clicking on it with the right button;
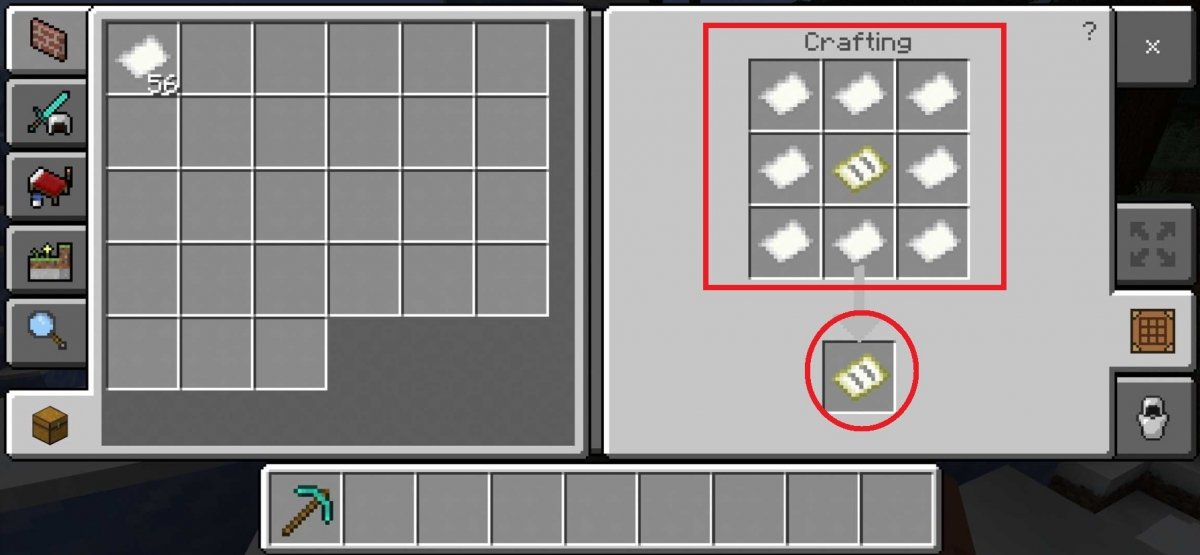
- Lay the materials. Place eight sheets of paper according to the 3×3 scheme, leaving the central cell empty;
- Place the compass. Take the compass and place it in the central cell;
- Create an empty map. When the sheets of paper and the compass are located correctly, you will see that an empty map appears in the slot of the craft table. Drag this empty card to your inventory;
- Activate the card. Holding an empty map in your hand, click with the right mouse button to activate it. As a result, the world around your character will appear on the screen;
- Explore and add details to the map. As you explore the world of Minecraft, the card will automatically fill in the terrain, buildings, and landmarks. You can also update the card by clicking on it with the right mouse button and creating a new empty map. This will create a copy of the original card, which will allow you to increase the scale and add more complex details.
Usage
After activation, it is necessary to leave the already studied area and start the study of the new square. Use the map to detect new sections of the world, simply moving in different directions and following the card’s readings. If a new section of the world is detected, you can create a new map of this square. This will allow you to save information about this site and will allow you to return to it in the future. Remember that to create a new card of another square, you need to move to a new area and repeat the process of activation and study. Thus, you can continue to open new areas of the world and create new cards.
How to make a large card in Minecraft
To increase the scale of the card in Minecraft, you first need to create an empty card on a layout or a cartographer table using 8 pieces of paper. Then the resources required to increase the scale and instructions for creating a larger card will appear in every corner. If you use a standard workbench, you can create a card size of 128×128 blocks. However, if you use a cartographer table, you can create a map of even larger sizes. Large cards are especially useful if you need to cover large territories and monitor moving throughout the map.
Duplication of the card
- Collect the necessary materials. To make a duplicate card, you will need a sheet of paper and the original card that you want to copy;
- Install a workbench or a cartographer table. Find a suitable place to work and install a workbench or a cartographer table. Make sure he is clean and ready to work;
- Put a card and paper on the table. Take the original card and put it on the table. Then put a sheet of paper on top of the card. Make sure that the paper is leveled with the map and completely covers it;
- Run the duplication process. After the card and paper are correctly located, click the “craft” button on a workbench or a cartographer table;
- Wait for the completion of duplication. The process can take a few seconds or minutes, depending on the speed of your workbench or cartographic table;
- Check duplication. After completing the process, check if your card is successfully duplicated. Now you should have two identical cards – the original and the newly created copy;
- Repeat if necessary. If you want to make more copies, just repeat the process by putting another sheet of paper on a workbench or a cartographer table and again clicking on the craft button.
Enjoy the fact that you have several copies of your card, and do not forget to store them in a safe place to use in the future or share with others.
Frames, markers, and other functions
To set the marks on the map in Minecraft, you first need to create a banner with the desired image and color. Then place the banner on a workbench with a map to create a label. The mark can be placed on the map by clicking on the right mouse button at the desired point.
To put the card in the frame, first, you need to create a card using paper and a compass. After that, hang the frame on the wall and click on it, holding the card in your hands. This will place the card in the frame, displaying the selected area.